Bobbin Lace and Other Hobbies

Search This Blog

Pages

Divider Pins made from Big Beads

Big beads mean more divider pins!  

These oversized pins are used for holding lace bobbins in place on the lace making pillow.  I just had to make myself another two after finding these huge, delightful beads on a market stall.  

To make my divider pins, I sacrificed two 3 inch long needles.  Needles are best to make these due to the way the steel is tempered to make it take the flex of hand sewing, where long pins tend to bend or snap.  

The hole in the dotty one was so wide, I had to increase the size of the needle at the eye end.  I threaded button thread, a nice thick black cotton, and wound it closely, working downward from the eye end of the needle for the same length of the bead.  

A careful application of Cyanoacrylate glue (which we refer to in the UK as 'super glue') along the wound thread holds the thread in place.  The wide hole in the dotty bead took two layers of wound thread to fill the gap. When it was a nice fit, a final blob of glue and the needle was twisted in till it felt secure, then left to set.  If you don't want to have to unglue your scissor blades, wait till the glue has set before trying to trim close to the bead!

Thankfully, the second bead had a hole just about perfect size and it only took one winding of standard sewing cotton to make a snug fit.  

I have made a selection of divider pins from beads I felt were too nice to languish in a craft drawer and they go well with the 'proper' divider pins. 


A starter pincushion with some short, home turned wooden divider pins mixed with some collectable glass and resin pins. 


Torchon Ellie - An Adventurous Pattern.

Torchon is a geometric lace based on a 45° grid which doesn't lend itself to free flowing (often referred to as floral) designs.  Floral designs are not always flowers, many are animals, scrolls, ribbons and swirls. This design explores how to use the geometric grid and still have the curvey shape of a little elephant using a touch of Muaiga lace making (Made Up As I Go Along).  

The edges carry three pairs of passives.  These are added to and can increase up to 5 or 6 pairs of passives in parts.   When there is a ground pair with nowhere to go at an edge, it is taken into the edge as another passive.  This pair may be needed again when a new pair is called for a pin or two away, so it only needs carrying a short distance and doesn't get thrown out.

The passive edge is worked with cloth stitch.  Make the pins on the inside edge fit to the ground, but try and keep the outside pins evenly spaced.  

Where several pairs are leaving the ground and being added to the passives, the edges can become too dense.  If there are more than 5, some will need removing.  As the 6th pair is taken into the edge from the ground, I remove a pair from furthest from the ground.  

When taking in, sometimes two at a time, pairs, try to keep 5 pairs as a maximum which will give each pair chance to be worked in a little way along in the passives where they will move across to the outer edge to be removed further along.   Having a more pairs in a passive trail helps to secure the threads before they are thrown out and cut off.  There is no need to knot before cutting them off, the tight weave of the passive trail should hold the ends well. 

Removing from the left hand side usually takes the second and fourth bobbin, lift each up and make sure you can't see the worker laying underneath the thread. Do not take out two bobbins next to each other, it will leave a hole.   On the right hand side, use the third and fifth bobbin from the outside edge, again checking that the worker is not visible under each thread. 

Lift the bobbin and lay away from the ones you are working with, usually handy to have a pin placed high up to wrap them around.  In case you need to undo and redo anything, don't be in too much hurry to cut these off!  Leave 4-6 inches of thread when cutting off, they will be trimmed later.  

If there is plenty of thread left on a bobbin after you cut them off, wind it as another pair ready to add back into the work at a later stage.   Some sections may only need a new pair for a few pins, so even the short bits can be useful. 

The spiders and ground samples are numbered in order of working.  The pattern faces trunk at the top, with the tail at the bottom which is worked last. Most of the square blocks are dependant on the previous one having been worked first.  

The ground is Torchon ground, half stitch, pin, half stitch, but I altered this on the edges of each spider to Double Torchon ground of ctct, pin, ctct to hold tension better.  The whole pattern can be made using either one or a ground of your own choosing.  To make the blocks stand out more, add a gimp thread around each one. There will be a video on my Youtube channel on how to do this.  

Feel free to do your own thing and swap out the spiders for others, or make it all in a ground of your choosing.  The big heart can be made with half or cloth stitch which don't use the pinholes showing inside the heart, I left the holes visible for anyone not using the heart motif or would like to use a different heart stitch, maybe even sequins or beads? 

A .pdf of this pattern is available on my Facebook group page

 https://www.facebook.com/groups/907516516997481/

Page 1 Spiders and Photo

Page 2 Prickings - Spiders and Heart


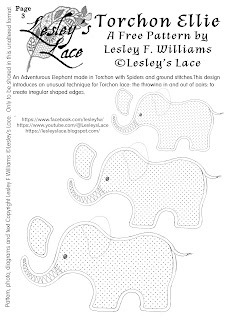
Page 3 Different Size Prickings - Naked!


Design Process Part 3 - Working the lace

 Yes, I have got the order a bit mixed up but it will sort itself out in time.

This is a little elephant design I created from a simple outline, dropped a dotted grid in and drew the stitches on so I could see where I would need to add and take out threads.  This is all part of the 'Muaiga' (made up as I go along) lace making ethic.  Designers work in so many different ways, I doubt I have made two pieces of lace the same way twice, always tweaking and experimenting.  These are some of my thoughts as I worked on this elephant.

I like to use a three or four pair passive trail when working on organic shapes, or 'floral'  as it is called in Bobbin Lace, even when there are no flowers involved.   This trail hides and carries extra threads and is handy to lay in new pairs when using up unjoined thread end bobbins and to remove or 'throw out' pairs before the trail becomes too thick.

First elephant looked a little skinny legged to me, and the rose ground was too large, and too loose so I altered those on the second version.  I dropped the eyes further down the head to make it less startled looking and reduced the tallies at the start of the trunk from 3 to 1.  I had thought they may look like a little flowery section, but they looked like crooked teeth!

The original head's roseground section was worked first, then the half stitch sections were made and sewed into the roseground outer edges.  While making the trail for the outsides of the half stitch, I had to keep in mind where the honeycomb stitches of the ear needed to join with sewings and the half stitch suffered as it didn't easily line up.  

The second elephant was made with the rose ground section worked at the same time as the half stitch panels so each row was worked across the three sections at the same time - half stitch, roseground, half stitch. This proved to be a neater solution but demanded more pairs and more concentration.

I lengthened the trunk, planning to have the elephant hold a flower, or a ball, which will be made afterwards. 

The natural instinct would be to start the ears at the top, however, thought had to be given to where the threads needed to start from so they ended on the outside to be taken into the trail rather than having to tie knots where the ears joined the head.  The direction worked is on a diagonal, there is a pink line showing the row which dictated this.  Nearly all the pairs are added by making sewings into the edge of the face.  

Towards the lower part of the ears, the lengths of thread needed became very short, some only going an inch or two before being thrown out.  This was fine because I had kept end threads on bobbins, expecting this to happen.  

Tying two short threads together and winding back the knot to one bobbin gave a working length of 6 inches between the two bobbins, this is enough just to make those tiny distances without having to use new thread.  Because I use the same white thread for all my experiments, I have a bundle of thread taken off bobbins and I can just pull a length out when I need a short bit. 

The trunk is made as a continuation of the face and finished at the tip.  On the first elephant, I unpinned the last inch or so of the trunk and pinned it away from the leg so I could work the leg in one piece, sewing the trunk to the leg afterwards.

The second elephant's trunk was worked differently, the trunk was left pinned down and I worked down to the trunk, made my sewings into the edge of the trunk, and made plaits to lay on top of the trunk. These were sewed into the lower edge of the trunk before continuing with the mayflower ground.  The one outer edge trail continued unbroken, only sewn to the edges of the trunk.   

This choice of continuing the threads unbroken dictated that the elephant was    worked face down. It would be turned over when finished. The bead eyes are no obstacle to this, they simply pop through the half stitch and appear on the other side after the piece is taken off the pillow. 

As I worked down to the foot, I didn't start the other side of the trail. Instead, I used glass headed pins to hold threads where they would normally have joined or turned at the edge.  This meant I could work just one edge trail all the way down, across the bottom of the foot, taking in and discarding threads as I went, and then work up wards to where the trail needed to join onto the trunk again, effectively making a 'U' shape trail.  

This avoided the need to have a join of two trails meeting at the foot.  Instead, it neatly sewed into the edge of the trunk with minimum fuss.   This is something I wish I had figured out earlier and will continue to use this method, though I am not sure if it will be frowned upon or not!

Directions showing 'U' turn working of the legs. 


The finished second elephant looks better for the effort made in replanning both the stiches and the order of work. 

First on the left, final on the right.  Spot the differences!

Part 2 - Drawing the design will appear at later.