Bobbin Lace and Other Hobbies

Search This Blog

Pages

Tiny Honeycomb Heart


I originally designed this little heart to use up the threads left on my bobbins after making larger patterns.  It soon became a project in it's own right when l used different fillings, passive stitches, edges and threads. Keeping to the same 4cm outline pricking, it became a handy way of experimenting with different ways to fill a small, curved shape.


The Honeycomb ground filling is based on approx a 60 degree grid. This is a six sided grid instead of the 4 sided Torchon style grid.  I like to use half stitch and twist, pin, half stitch and twist, which creates two twists after the cross instead of the usual one.  This gives an even hole surround to the honeycomb holes.  This can be varied by using different combinations like two extra twists on the legs or around the pin, for a different effect.  Well worth experimenting with this very useful ground.

Honeycomb is made by working one part of the stitch on the first row, then on the return, the second part of the stitch. 

On this little heart pattern, the edge pins cannot line up exactly with the honeycomb grid, so you have to use some artistic licence. Offer the pair to the first available pin, and then to the next one along to see which looks best.  Remember, you may need the next pinhole for the next row, so that is something else to consider.  

Near to the edge, where there may be a very close line of honeycomb stitches, you can choose to miss these out and stretch the honeycomb to reach the edge, or work them to keep the ground close to the edge.

Curvy edges create the need to add, throw out, and carry pairs.  This means the edge should be able to hide them as you go along to avoid knots.  Cloth stitch passives are the most forgiving.   Work the edge passives and pick up the pair you want to carry or remove, continue to cloth stitch through these and work the outer edge pin.  

To 'bounce' a pair off the edge - Work the pin and either swap the worker with the ground pair, or return the pair to the ground after working the pin. 
   
To carry a pair- Work it in with the passives till the pair is at the pin where you want it to re-enter the ground.  This makes a slight difference in the thickness of the edge so you don't want to carry too many extra pairs.  

To remove a pair after working it into the passives from the ground - Pick the second and fourth bobbin from the outer passives (making sure they are the ones that don't show the worker underneath when you lift them, if they do, choose the third and fifth bobbin)  and lay these back by lifting them upwards and lying them above your work so they don't get in your way.    
Don't cut these off yet, if you have made a mistake, you can reverse your work and pop them back into place, but once cut off, you don't have this option. 


I made this large heart with crochet thread 20 to make it easier to see during a live pillow in a zoom group.  


Test before Investing in a Bolster Pillow

Two pairs of lovely Duchesse bobbins came into my possession which created a need to try out a bolster pillow.  All the sawdust and cutting straw put me off making one so I made this bolster pillow just to try out my 2 pairs with a little 2 pair pattern.  

It is not meant to be passed down the generations, or to do more than satisfy my curiosity as to whether I want to go down the path of using small numbers of bobbins and making tape laces, or do I stick with my favourite block pillows and loads of Midlands bobbins. 

Kitchen roll, cotton fabric, boiled wool blanket, pins.

Wrap the kitchen roll tightly in two or three wraps of the blanket, cutting the edge to the same width as the kitchen roll.  Tension and pin the end, sew to secure and remove pins.
Cut fabric to leave 6 to 8 inches over at each side, wrap around tightly and turn under the edge along the roll, pin in place.  I didn't plan to make lace over the pinned area, if you do, then simply sew this edge the same way as the blanket.  
Gather the excess fabric at one end, twist it around tightly and push it down into the centre of the roll.  
Stuff the fabric down into the roll by using up any scrap blanket trim, or socks, or similar to add weight to the roll, and to secure the ends.
At one end I squeezed in a small pin cushion, just the right size!  
Sit the bolster in a box, or roll a towel or blanket to make a long sausage and wrap it around to make a nest for the pillow to sit in. 
I drew a quick tester pattern for using the two pairs of bobbins I have, this was just to see how they handled. 
They behaved quite well.  Keeping track of 4 bobbins was easy enough.  The creases on the edge of the roll worked to hold the bobbins when I placed them over the sides. 
I tried a little bit with the bolster up on it's end. 
My little piece of tester two pair lace.  So far so good.  It feels strange to be a beginner again and have to learn how to handle bobbins in such a different way. 
 
This bolster pillow can be unwrapped, fabric reused, and the kitchen towel (although a little fluffier for being stabbed with pins) can be put to it's normal use.  A good way to test before investing.  


Shivery Squirrel

My word but it was cold this morning!  
I took my 'fresh off the pillow' squirrel into the garden so I could take it's photo against the dark green leaves of our Bay tree.  With the help of a handy twig, I held it up to take a photo, but by this time, I was shivering, so was the little stick!   My mobile phone did it's best and I raced back inside the house to see if I had managed a shot.  Not willing to go back outside and set up for a shot again, I deemed this to be as good as it gets for a one shot wonder, it shows enough for you to get the idea.

This little piece of lace is a true 'Muaiga' piece, I blended a Torchon fan in the face, a bit of Honiton in the big leaves, used a few bar joins from my recent play with Idrija lace, and scattered all over with bits of Cluny and Bedfordshire.   

Not being sure if the mass of plaits in the tail would hold up to being handled, I damped it down on the pillow and let it dry before unpinning it, ironed it and only then did I dare take it outside.  Because of the damp climate I live in, a piece of lace will soon droop when taken outside so I do only get one or two tries at taking a photo before it droops.


Single thread Picot Video

Single Thread Picot on YouTube

I made this video to remind myself a much as anything. A couple of times I have had to look up, or ask how to make, these little picots!

These single thread picots are very handy when making a plait which needs to stay in a curved shape ( a two thread picot usually gives a sharp bend to a plait). Also used for making crescent leaf tallies, and can be used multiple times along a plait without creating much disturbance to the appearance of the plait. When using thick thread, a two pair picot will be quite a large one. The single thread picot can be used around a fine pin, and doesn't need the twists to make it work as only one thread goes around the pin.

Single thread picot are handy when using thicker thread to avoid a large picot made when using the two loop method. Although this produces a single thread loop, two threads are used. patterns available at https://www.youtube.com/@LesleysLace https//www.facebook.com/lesleyfw


https://youtu.be/P--z4h_GRL0?si=T13_8HNZkJbvL10a


Warm Coat and Hat

 Just for fun, I recreated this little Christmas tree decoration in lace.

Dipping a toe into the world of tape laces, I made a tester piece before trying out a design of my own. There is a bit of 'Muaiga' lace involved, as there usually is when I make a piece of lace! (Made Up As I Go Along)

The 'wriggle' I drew freehand.

The main technique, I think, is to work the curves without pins on the inside, using turning stitches instead. This means the tensions have to be kept under control or the curves soon become uneven.

The curves are held in place with edge stitches being twisted around pins halfway between the outer and the nearest other edge pin. This is done in advance and picked up when the other side of the join is working an edge stitch to sew into the waiting one.

Because of the multiple twists, and the longer length of the loop, this is much easier to sew into than a standard edge hole. I used both crochet hook and eyes out tool, both worked as easily as each other.

The main difficulty with this wriggly style lace is to keep the pins already in the work covered while the pattern is turned around many times, keeping the tape facing downwards maintain tension.

The hands and feet are made with leaf tallies using the two edge pairs.  They work out as a tally, then turn with a cloth stitch around the pin, and work a plait back to the edge.  Work a cloth stitch around the same pin, then continue working.  

At the edge of the hat, having worked the first two rows, I used two passives in a plait to join the second row to the first.  Work through the passives and back to get the worker higher up the edge and work half stitch with extra pairs added along the edge of the brim.  At the far side, add 4 pairs, this is 3 passives and an extra worker pair to make the two pair edge.   

Tie a knot at the top, cut and leave a tassel.   I

This is an experimental piece, being my first in this style of lace, so there will be much better solutions for some of the workarounds I have used.  There is so very much to learn!  I perused Idrija lace to find some of the techniques and, in time, will have a better understanding of this versatile lace.  


Mad Calm Quilt

I started by using up old scraps of fabric, then I was buying more fabric to cut up, only to sew it all back together...madness!    
Using the 'crazy log cabin' style l made a blocks now and again, added a layer of microfibre fleece and backing fabric before oversewing around the square spiral to create the same spiral pattern on the back.  Amazingly, thanks to investing in rotary cutters, cutting mats and quilting rulers, it all lined up perfectly. 
The little puzzle ball is made from scraps.  Quite ingenious how all the pieces fit together.  


Sequin Fish

The Adventurous Aquarium is growing!

This fish sparkles with sequins, beads and thread, there should be enough glitter for the magpie in all of us!  

I chose to make a chevron edge on this version of the Sequin fish but the chevron can easily be replaced with adding extra passive pairs, sparkly ones would be good. 

I chose silver sequins and I worked them with 4 pairs of Gütermann silver glitter thread. When adding the sequins, the pairs from each side do not cross over each other in the middle.  Work them with one pair at a time.  The left pair sews through the centre, then returns to the left side, and the right to the right.  Place a pin in the centre of the sequin so the tensioning of the sequin thread does not disturb the equal distribution of the sequins. On a larger area of sequin ground, this is quite important. 

4 pairs of silver for adding the sequins (when cut off, they are reused for the tail sequins so wrap more thread on one bobbin than the other).  

4 pairs of Perle 8 in two contrasting colours for the chevrons. Simply increase the passives if you don't want to do the chevrons. 

6 short pairs to add in for the passives in the fins. 

4 pairs passives (placed on each side of the chevron threads)

4 pairs of workers

There are tutorials for the chevron edge, adding sequins and beads on my youTube channel. 

https://www.youtube.com/@LesleysLace/


Triangle Tree


Another pattern to play with.  I used honeycomb for the filling with two twists throughout the ground.  You could work this without the twists around the pin, and add sequins or larger beads.  I used a thicker thread and made the passives quite tight to make the edges stiffer.  Using a neutral ecru thread for the two pair edge to avoid interfering with the ombre effect of the three green shades of the passives.  


Option 1 is to start at the top with a plaited rope using two pairs, these can then be used as workers or passives as they enter the top of the tree, adding more pairs as described in the 'Beaded Bracelet' or the 'Charity Ribbon' patterns.

Option 2 is to start with the bottom, widest edge.  This means you will be adding all the pairs to start with, throwing out pairs as you work up to the top.  At the top, throw out all but the last two pairs and make the plait loop as the last thing.  The ends to be sewn and knotted into the top of the tree.  


The honeycomb pairs are added from the sides, these two diagrams show the pairs added, and the second shows how they 'bounce' off the sides and some get carried along with the passives for a pin or two.


The little red square can be added afterwards by sewing in some new pairs.


Roseground Bracelet


This is a version of the Beaded Bracelet in an earlier post which uses the same loop and button fastening and the same way of adding and throwing out the threads.  In place of the beads, I used a roseground stitch in two shades of pink.  

Roseground is a very versatile stitch with over a dozen versions.  In this piece, the colours change places depending on whether you choose half stitch or cloth stitch, and if you start with the threads in different places etc.  The roseground section could have just been made in one colour.   The 'rose' is the fancy circle in the middle, at the sides, there are half roses.  Due to the stitches I chose for this piece, the colours stood out in a bell shape at first sight, totally unexpected but quite a nice touch for this bracelet.  
 
The passive and roseground threads were two different sizes, this is not important, they could have easily swapped places and made just a slight difference to the piece.  The worker pairs are a standard Egyptian Cotton machine quilting thread of about 27-30 wraps per centimeter.  Using a finer thread for the workers makes the stripe of passive colours on the edges show up better.  

 I do like the idea that lace makers will have a play with my designs and use different threads to create another version.  Not everything has to be in white!

Video tutorial on my Youtube channel.  https://youtu.be/0qluduvbMJQ?si=073o4W2B7C5tAX-K

 The downloadable .pdf pattern sheet is in the Files tab on my Lesley's Lace facebook page.

The A4 .jpeg can be copied from here, or my Lesley's Lace facebook page.

Please always respect the copyright of the designer.

This pattern must only be shared in its original form and cannot be sold.

If you wish to teach from this, or any other of my free patterns, please ask for permission first.

If you wish to include any of my patterns in group news letters or magazines, please ask first, and let me have a copy for my records.

Have fun!


Leaf Tally Fish

 Leaf Tally Fish, a new addition to the Adventurous Aquarium. Print out at A4. Add pairs for the fins and for the inside edge passives of the tail.  I use mostly Egyptian cotton, machine quilting thread in a variety of colours.  They measure about 27 to 30 wraps per centimeter.   

The leaf tallies can be replaced with a standard crossing of plaits, or make a small half stitch or cloth stitch bud (circle) in the middle where the threads would normally cross.  This is a good way to make patterns where the amount of leaf tallies puts you off, the 'bud' works with pairs or plaits entering it.  You can see how this works in the little fish I made to use up some thread ends.  

Video on how to measure wraps per centimeter and my other video tutorials here...  https://www.youtube.com/@LesleysLace/


Pattern prints at A4

Thread end fish, using chevron stitch on the edges, and buds in the body.  


Beaded Bracelet in Bobbin Lace


My new Beaded Bracelet pattern introduces a few new techniques which are also shown as videos on my YouTube channel.  The beaded bracelet pattern can be altered to create matching earrings, pendant and necklace.  To make it you need 10 pairs of bobbins, small beads, and a full rainbow of coloured threads.
The pattern is printed as an extra long bracelet, it can be tailored to fit by cutting the pattern in half in the middle and lining up the beads to shorten as much as you wish.  To lengthen it, simply print two copies, and insert an extra length in the middle.
If using thinner threads than recommended, add more passive pairs, if using a thicker thread, use fewer passive pairs.  Keep the worker pair around the 22-30 wpc size. 

This pattern prints out at A4 size. 


Tally Star Muaiga lace

Teeny owls checking out the new Christmas Star fresh of my pillow.   I used a few new techniques and enjoyed the challenge of figuring out all those crossing trails.  Not really a single lace style because l had to mix parts up to get the result l wanted so again, it's a "Muaiga"  (made up as l go along) piece of lace rather than pure Bedfordshire or Cluny.   
70 pairs approximately used for this one, l do enjoy having a pillow full of white wound Parsons bobbins to work with.   


Moving pictures!

Moving pictures, how very modern!   I have had a go at making some youtube videos to help with making my seahorse and, hopefully, other beginner patterns.  

https://youtube.com/@LesleysLace?si=4f-UGPlgqaVhOrxD


Play with a fishy template


Continuing with the aquarium theme, l drew an ellipse shape to make into fishes.  Threw in seed beads, chevron braids, sequins and a variety of stitches to create these four fish.  


Bobbin Lace Aquarium

 Thank goodness l finished the seaweeds at last.  My seahorses were floating around all over the place😄  

Curly seaweed is made with random seed beads along the edges and the fronds feature chevron stitches.  

I made lots of leaves over the years, using up left over thread after big projects to test out new stitches and edges.  I thought they would work well as little fish for this aquarium photo.


Adventurous Seaweed!


Adventurous Seahorse needed a home so here it is, Adventurous Seaweed!
 I'm off to see what I can find to use as adventurous thread to make these ðŸ˜ƒ

The downloadable .pdf pattern sheet is in the Files tab on my Lesley's Lace facebook page.

The A4 .jpeg can be copied from here, or my Lesley's Lace facebook page.

Please always respect the copyright of the designer.

This pattern must only be shared in its original form and cannot be sold.

If you wish to teach from this, or any other of my free patterns, please ask for permission first.

If you wish to include any of my patterns in group news letters or magazines, please ask first, and let me have a copy for my records.

Have fun!


Adventurous Kitty

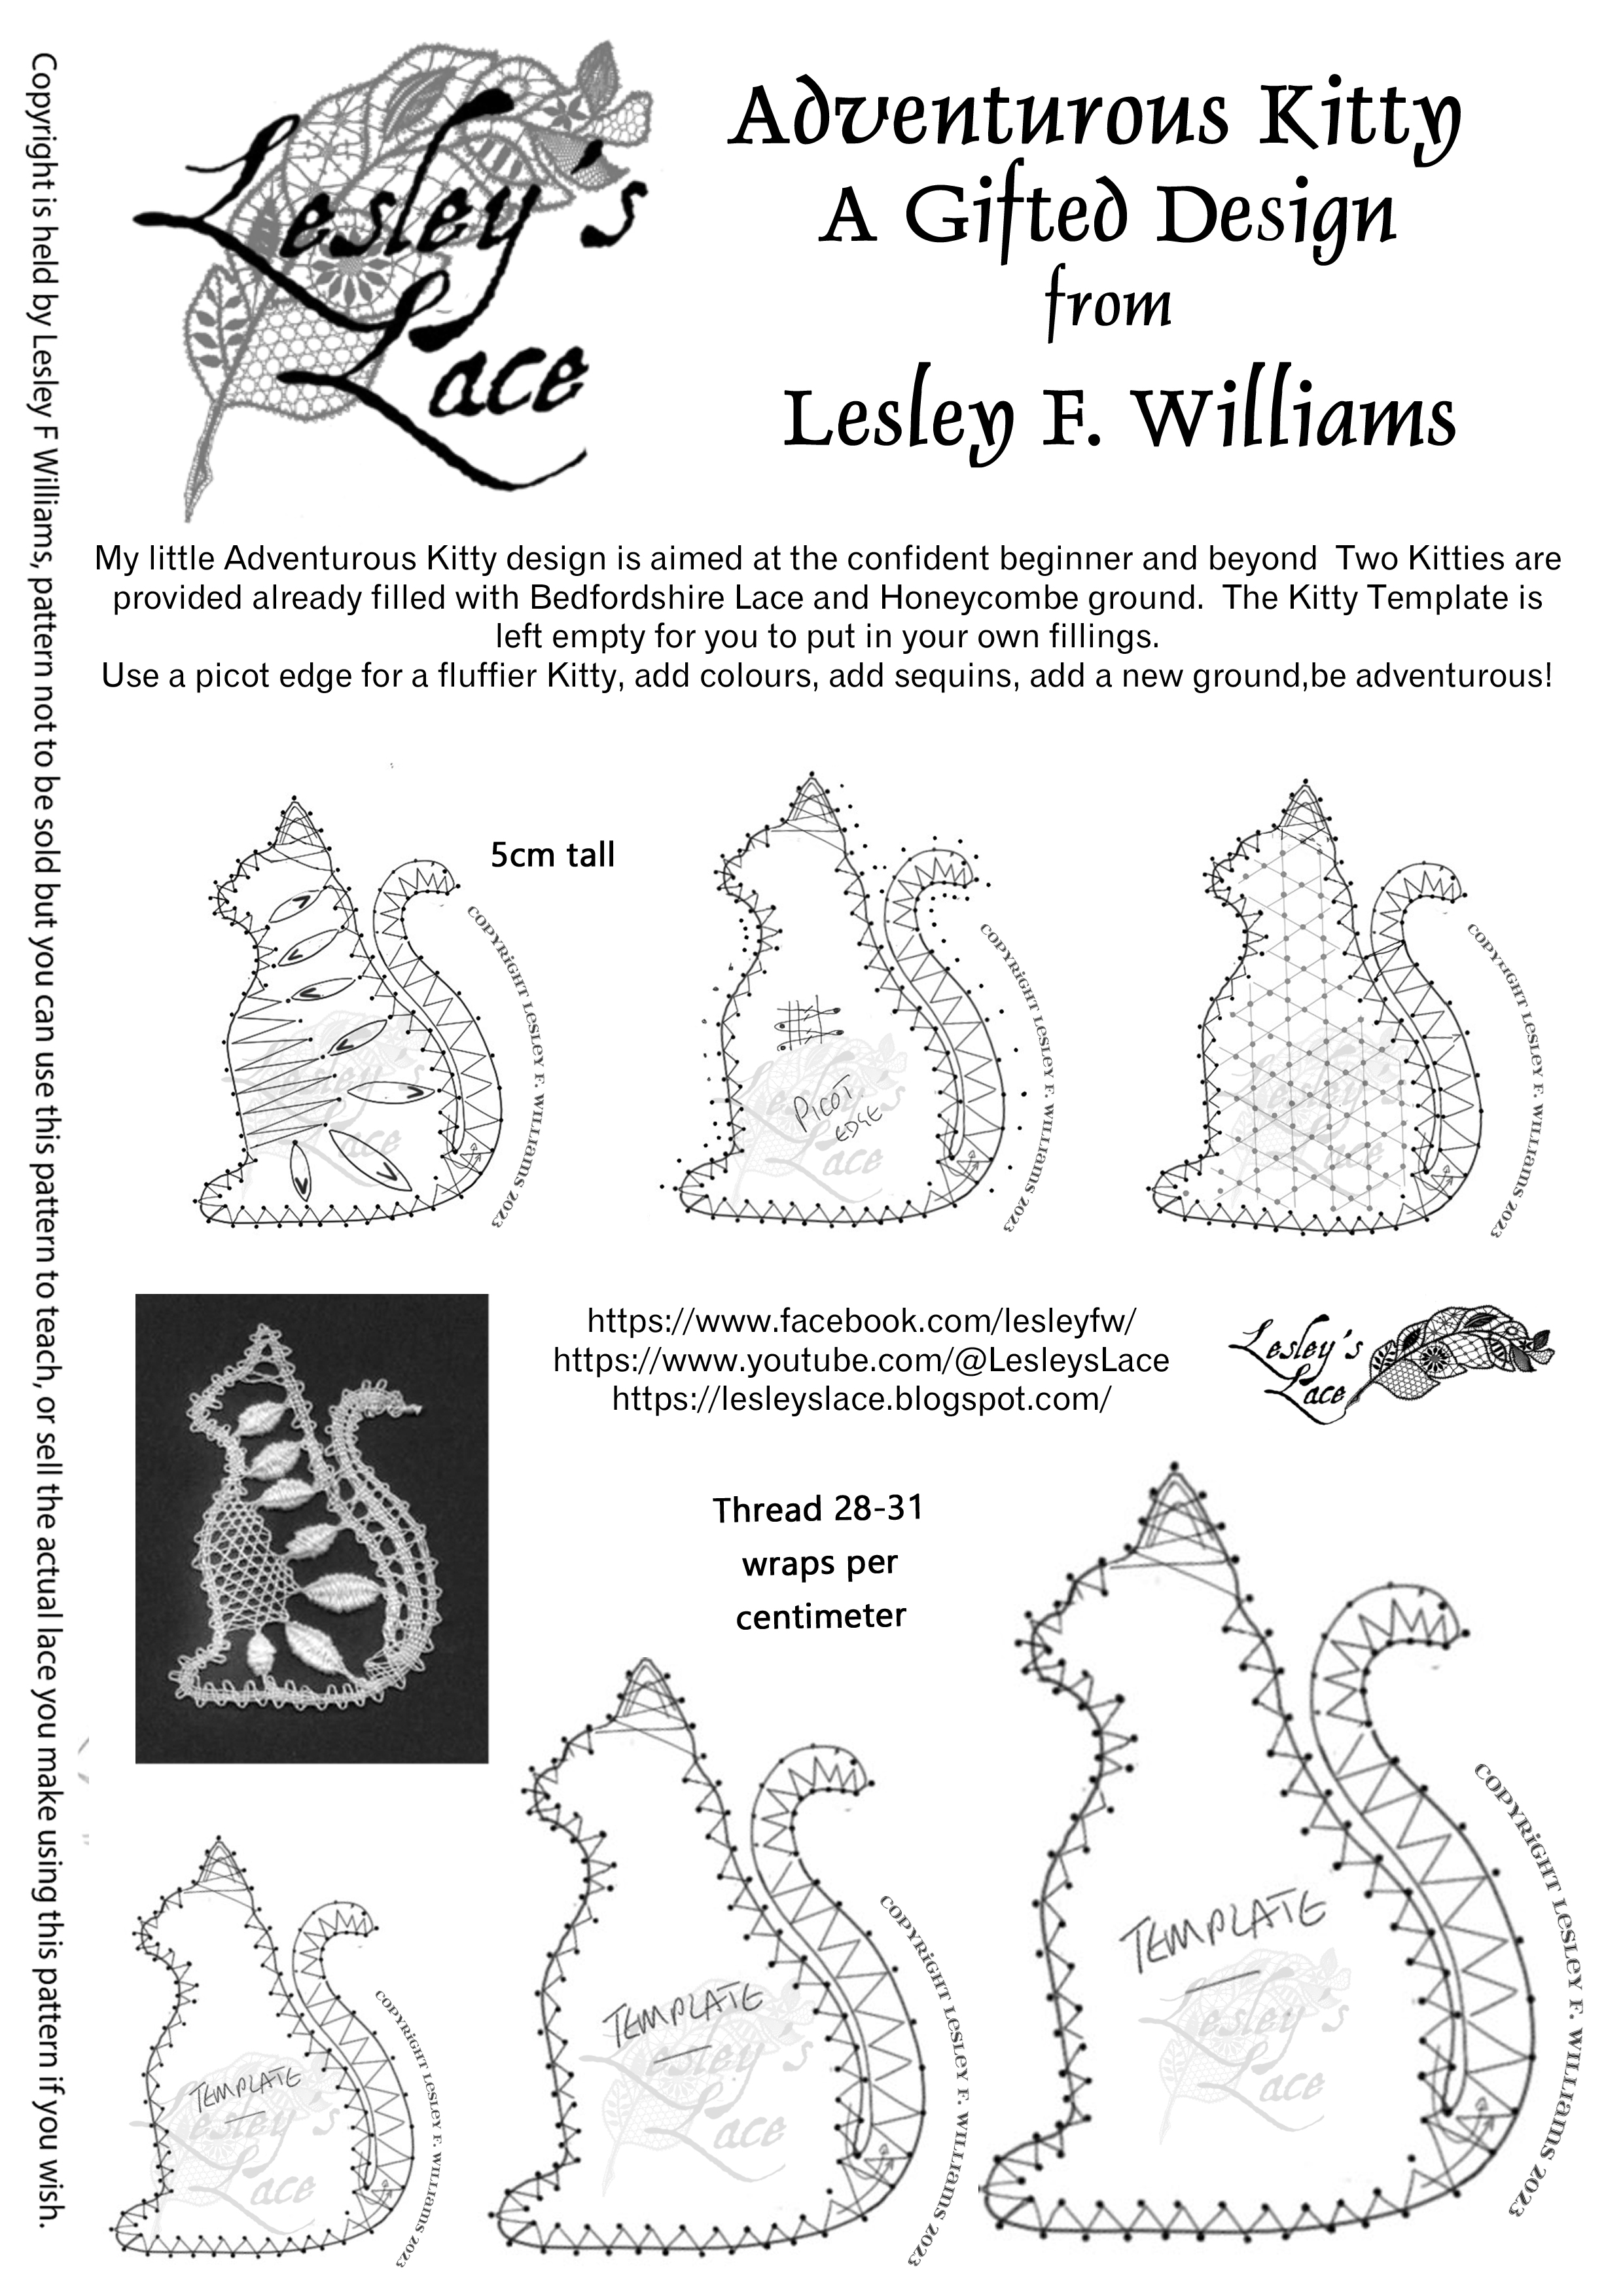
 Gift pattern of my tiny Adventurous Kitty. Ideal for inserting in keyfobs, phone cases and cards.

This little Adventurous Kitty design is aimed at the confident beginner and beyond. Two Kitties are provided already filled with Bedfordshire Lace and Honeycombe ground. The Kitty Template is left empty for you to put in your own fillings. Use a picot edge for a fluffier Kitty, add colours, add sequins, add a new ground, be adventurous! Prints out at A4.


Muaiga Muffins

In my customary 'made up as I go along' manner, I make cakes the same way.   This is the latest favourite bake.  It's all about making it as simply and least messy way possible, I am not a fan of cleaning up mess afterwards. 

I don't usually weigh ingredients, so this time I have put the bowl on a scale and set it to zero before adding the next ingredient. 

Not sure why, but I started with the fat, half margerine and half peanut butter this time, it looked about right to me and the scales say 116g this time. 


I usually use much soggier bananas, often two rather than one and add more flour, oats, maybe coconut to off set the wetness.  This time I cut up a small eating apple into little bits and cut the banana about the same.  


Next the eggs go in.  These lovely posh orange yolked eggs were not as large as normal so I chucked 3 in. 

Sugar weighed in at 107g, I don't use much sugar, the fruit is often sweet enough but I tipped the jar a bit too fast.  To offset the sweetness, I didn't add the sultanas or coconut. 


Couple of handfulls of rolled oats.  Forgot to weigh them!  I like to throw these into any wet mixes because they hold the cake together well, are good for old folks and make it easier to carry on walks etc. 


Good old self raising flour.  173g this time, could have added more, would have made more cakeiness to wrap around the fruit but it was enough this time as the banana wasn't over ripe.


Forgot I had these crystalized ginger pieces so cut some up and threw them in. 


Chocolate chips - yippee!  (I may have saved a few in the bag for my secret stash, shhh!)


Yes, I admit it, I use my marmalade making spoon for cake too.  It has a long handle and I put my mixing bowl on a stool so it's easier to stir stuff up.  It is a bit stiff to start with but soon blends with gentle folding.  We like the lumps of fruit so no point whizzing it all up in a mixer (and creating more fuss and washing up).


This looks about right.  A good batter consistancy and plenty of lumps left.  I could add more flour or oats but it seems to cook better left like this.  I didn't put any spices in this time, you can add any you like, personally I go for mixed spice and maybe a bit of molasses or black treacle for a winter cake. 


Makes 6 or 7 large muffins (or cakes as we call them).  I always use an extra little tin to make one for my Mum who likes to cut a little cake into pieces. 


Middle shelf of the oven at gas number 3 or 4 (the numbers have rubbed off the dial) for about half an hour.  Test with a clean cool knife poked down the centre, if any mixture comes up, then it needs a bit longer, if melted chocolate comes up, you can lick that off later. 


Also known as battle cake, these are particularly handy on walks, shoved in a pocket or handbag.  There are not many cakes you can do that with!

Happy caking!