Bobbin Lace and Other Hobbies

Search This Blog

Pages

Divider Pins and Pincushions.

My divider pins outgrew their original pincushion so I made a big red velvet one to fit this rather splendid painted wood bowl.

Divider pins are used to hold back, separate and generally act as anchors on lace making pillows.  I made many of these from beads glued to needles and many wooden ones when I was learning to wood turn.   The rest arrived in mixed bundles of experienced bobbins and an occasional gift.

Today I discovered one was also a needlecase!  I have had it for a while and when I pulled it from the old pin cushion, the top came off, revealing it's secret.


Rose Ground with Seed Beads

A while ago I answered an advert for some seed beads, the photo showed several neat little tubs of assorted beads and I went off to collect them.  I expected those little plastic tubs about 3 to 4 inches across, there would be more than enough for me to play about with.

The lady opened her door to me, looking relieved to see me.  Without wasting any time, she passed a couple of big plastic storage boxes to me, they were heavy!  I questioned that these were the beads I had come for, and not someone else's purchases and she opened the door to show a stack of more craft boxes and bags taking up valuable room in her small hallway.

We brought the car nearer and opened up the boot, so much for the bag I had fetched for the little boxes, I had completely got the sizes wrong.
When she finished passing all the boxes, she asked if I wanted some lace and trim stuff too.  

'Why not?" I said, and filled the other half of the boot with bags and bags full of all sorts of trim, lace, rikrak and appliques.  

"Embroidery threads any use to you?" she asked, and before I could answer, another stuffed bag was passed out of the doorway.

I gave her more than she had asked for but suspect she was more thankful for the space she had recovered than the money.  The door was quickly closed, as if she was fearful that I was going to give it all back!

My husband was bemused to say the least, wondering what on earth I needed with so much stuff. I assured him that I had no idea there was going to be so much.

The haul weighed in at 1.2kg of embroidery thread, of which I took what I wanted and passed the rest on.  The lace etc. weighed in at over 7kg, again, I took what I wanted and passed most on to others.   

The seed beads weighed in at over 18kg!  This kept me busy for a while, sorting and rebagging into more useful, smaller sized amounts.  A school took all the bigger glittery, cute, and child friendly beads and pendants, leaving me to squeeze as many as I could into my craft space.  

I advertised the boxes of mixed up seed beads, (noone has that amount of time on their hands to sort that many out) and found it hilarious that the lady who collected them was as surprised as I had been at the size and weight of what she had also thought were smaller boxes. 

I figured out that this had all come from someone who must have held classes in beaded jewellery, and her neighbour had kindly offered to help rehome it all, not realising how much there was of it. 
 
I am making as much use of it as I can, but a teeny packet of seed beads goes an awful long way (especially when you spill one on the floor!).  

Adding the seed beads in different ways to bobbin lace is fun, I may try to add some into my embroidery and my quilting, basically anything I can use them on will be beaded!

I nearly forgot, there were sequins too...

Video for adding the beads to Rose Ground in Bobbin Lace. 


Seed Beads in Rose Ground


Logarithmic Bow - Update 2024

This version is the same pricking with more info.  I have also made a third version to suit  'US Letter' size paper which is shorter than our A4 size and this meant the ends were missing from the pricking.  

There are video tutorials on my YouTube channel for this pattern.

https://www.youtube.com/@LesleysLace/videos


A4 print size
US Letter size print version


Pink Kisses Butterfly

It was March 2020, I received a call from the hospital.  A cancellation had opened up a slot and I could have my new hip months earlier than expected!  Delighted and dreading this event, I appreciated the very short notice as it gave me little chance to get too worked up about such a big operation.  

I was only just taking my new hip's first steps, trying to trust this 'alien' tech to support me along the hospital corridor, that the country, and most of the world went into the first pandemic lockdown and everything changed from that day.  

I embraced lace making videos during my journey back to mobility, making the most of being confined to just our home and small garden.  Physiotherapy, social life and life in general was managed over the phone, or on a little square screen.  The nurses and medical staff were outstanding, my Mum was a treasure and Himself will always be my hero for the support I received.

For all the people who helped me, and for all the people who were stuck inside, I released my Pink Kisses butterfly.  This was an early attempt in creating my own patterns, and also to learn how to make leaf tallies.  


I learned that the Gutermann variegated threads, change colour quickly and this produces a stripy effect in the tallies, this effect varies from maker to maker.  The Gutermann sparkle Sulky thread used for the passives gave a little bit of fun, and I learned to not try to tension this particular thread because it has a slightly elastic property which can slightly ruckle a pattern when released from the pins. 

There are few instructions with this pattern, I was learning as I went along and had no plans to release patterns this early in my Bobbin Lace making journey.  I have a note that says I used 60 pairs of bobbins, but that was before I knew about making sewings so I added all the pairs for all four wings as I worked down the body, leaving a huge pile of bobbins waiting on the opposite side to the first two wings!

If I were to make this again, I would make quite a few changes with what I have learned since.  Digging this pattern out of the files has also been a little trip down memory lane for me, the strange, scary world we had to live in, the new challenges, and for me,  relief from the pain of a worn out hip softened the blow of isolation.

Have fun with Pink Kisses, coming out of its isolation at last!


...and now for something completely different!

Great fun was had this morning playing in the sunshine, finally dealing with a pile of papers which needed to be safely disposed of.  

This pile had been growing since we stopped using the woodburner after many years. A trusty eater of confidential information, broken furniture and a few trees, the woodburner had given us good service and now is relegated to serving as safe storage for batteries.

Also starting a new life is an old hand blender, which was never quite fast enough to make things frothy but was not beyond it's useful years (a qualification which is deemed more valuable now we are racing headlong through the decades at an ever increasing rate).  It has languished at the infamous back hole that is the 'back of the drawer' where potentially useful, but not used, items live. 

Long after being replaced by a shinier, newer model, this old blender is pressed into service once in a blue moon to produce an annual mash up more akin to a children's playgroup than a pensioner's pastime.

Tearing the papers into little bits as we go along saves a long arduous task when it comes to finally processing the papers.  Soaking overnight in a water and a dash of washing up liquid helps to soften the mass and the wzzz wzzz chug of the blender soon reduces the pile of intimate details to a pale grey sludge.  

A microfibre cloth spread out on a bit of gravelled garden is ideal for processing the goodly dollops of sludge. The cloth is twisted and then the water squashed out of it with a block of wood (which escaped the final burnings of the woodburner to enjoy it's singlularly useful second, or maybe third life as a de-wetter for sludge).

The cloth peels back to reveal huge chewing gum like lumps which are left in the sunshine to dry.  Ideal for some form of model crafting if we really wanted to go down that route, but they get crumbled up when dry and disposed of.  


Tub '0' Sludge


Paper stones


Divider Pins made from Big Beads

Big beads mean more divider pins!  

These oversized pins are used for holding lace bobbins in place on the lace making pillow.  I just had to make myself another two after finding these huge, delightful beads on a market stall.  

To make my divider pins, I sacrificed two 3 inch long needles.  Needles are best to make these due to the way the steel is tempered to make it take the flex of hand sewing, where long pins tend to bend or snap.  

The hole in the dotty one was so wide, I had to increase the size of the needle at the eye end.  I threaded button thread, a nice thick black cotton, and wound it closely, working downward from the eye end of the needle for the same length of the bead.  

A careful application of Cyanoacrylate glue (which we refer to in the UK as 'super glue') along the wound thread holds the thread in place.  The wide hole in the dotty bead took two layers of wound thread to fill the gap. When it was a nice fit, a final blob of glue and the needle was twisted in till it felt secure, then left to set.  If you don't want to have to unglue your scissor blades, wait till the glue has set before trying to trim close to the bead!

Thankfully, the second bead had a hole just about perfect size and it only took one winding of standard sewing cotton to make a snug fit.  

I have made a selection of divider pins from beads I felt were too nice to languish in a craft drawer and they go well with the 'proper' divider pins. 


A starter pincushion with some short, home turned wooden divider pins mixed with some collectable glass and resin pins. 


Torchon Ellie - An Adventurous Pattern.

Torchon is a geometric lace based on a 45° grid which doesn't lend itself to free flowing (often referred to as floral) designs.  Floral designs are not always flowers, many are animals, scrolls, ribbons and swirls. This design explores how to use the geometric grid and still have the curvey shape of a little elephant using a touch of Muaiga lace making (Made Up As I Go Along).  

The edges carry three pairs of passives.  These are added to and can increase up to 5 or 6 pairs of passives in parts.   When there is a ground pair with nowhere to go at an edge, it is taken into the edge as another passive.  This pair may be needed again when a new pair is called for a pin or two away, so it only needs carrying a short distance and doesn't get thrown out.

The passive edge is worked with cloth stitch.  Make the pins on the inside edge fit to the ground, but try and keep the outside pins evenly spaced.  

Where several pairs are leaving the ground and being added to the passives, the edges can become too dense.  If there are more than 5, some will need removing.  As the 6th pair is taken into the edge from the ground, I remove a pair from furthest from the ground.  

When taking in, sometimes two at a time, pairs, try to keep 5 pairs as a maximum which will give each pair chance to be worked in a little way along in the passives where they will move across to the outer edge to be removed further along.   Having a more pairs in a passive trail helps to secure the threads before they are thrown out and cut off.  There is no need to knot before cutting them off, the tight weave of the passive trail should hold the ends well. 

Removing from the left hand side usually takes the second and fourth bobbin, lift each up and make sure you can't see the worker laying underneath the thread. Do not take out two bobbins next to each other, it will leave a hole.   On the right hand side, use the third and fifth bobbin from the outside edge, again checking that the worker is not visible under each thread. 

Lift the bobbin and lay away from the ones you are working with, usually handy to have a pin placed high up to wrap them around.  In case you need to undo and redo anything, don't be in too much hurry to cut these off!  Leave 4-6 inches of thread when cutting off, they will be trimmed later.  

If there is plenty of thread left on a bobbin after you cut them off, wind it as another pair ready to add back into the work at a later stage.   Some sections may only need a new pair for a few pins, so even the short bits can be useful. 

The spiders and ground samples are numbered in order of working.  The pattern faces trunk at the top, with the tail at the bottom which is worked last. Most of the square blocks are dependant on the previous one having been worked first.  

The ground is Torchon ground, half stitch, pin, half stitch, but I altered this on the edges of each spider to Double Torchon ground of ctct, pin, ctct to hold tension better.  The whole pattern can be made using either one or a ground of your own choosing.  To make the blocks stand out more, add a gimp thread around each one. There will be a video on my Youtube channel on how to do this.  

Feel free to do your own thing and swap out the spiders for others, or make it all in a ground of your choosing.  The big heart can be made with half or cloth stitch which don't use the pinholes showing inside the heart, I left the holes visible for anyone not using the heart motif or would like to use a different heart stitch, maybe even sequins or beads? 

A .pdf of this pattern is available on my Facebook group page

 https://www.facebook.com/groups/907516516997481/

Page 1 Spiders and Photo

Page 2 Prickings - Spiders and Heart


Page 3 Different Size Prickings - Naked!


 The downloadable .pdf pattern sheet is in the Files tab on my Lesley's Lace facebook page.

The A4 .jpeg can be copied from here, or my Lesley's Lace facebook page.

Please always respect the copyright of the designer.

This pattern must only be shared in its original form and cannot be sold.

If you wish to teach from this, or any other of my free patterns, please ask for permission first.

If you wish to include any of my patterns in group news letters or magazines, please ask first, and let me have a copy for my records.

Have fun!


Design Process Part 3 - Working the lace

 Yes, I have got the order a bit mixed up but it will sort itself out in time.

This is a little elephant design I created from a simple outline, dropped a dotted grid in and drew the stitches on so I could see where I would need to add and take out threads.  This is all part of the 'Muaiga' (made up as I go along) lace making ethic.  Designers work in so many different ways, I doubt I have made two pieces of lace the same way twice, always tweaking and experimenting.  These are some of my thoughts as I worked on this elephant.

I like to use a three or four pair passive trail when working on organic shapes, or 'floral'  as it is called in Bobbin Lace, even when there are no flowers involved.   This trail hides and carries extra threads and is handy to lay in new pairs when using up unjoined thread end bobbins and to remove or 'throw out' pairs before the trail becomes too thick.

First elephant looked a little skinny legged to me, and the rose ground was too large, and too loose so I altered those on the second version.  I dropped the eyes further down the head to make it less startled looking and reduced the tallies at the start of the trunk from 3 to 1.  I had thought they may look like a little flowery section, but they looked like crooked teeth!

The original head's roseground section was worked first, then the half stitch sections were made and sewed into the roseground outer edges.  While making the trail for the outsides of the half stitch, I had to keep in mind where the honeycomb stitches of the ear needed to join with sewings and the half stitch suffered as it didn't easily line up.  

The second elephant was made with the rose ground section worked at the same time as the half stitch panels so each row was worked across the three sections at the same time - half stitch, roseground, half stitch. This proved to be a neater solution but demanded more pairs and more concentration.

I lengthened the trunk, planning to have the elephant hold a flower, or a ball, which will be made afterwards. 

The natural instinct would be to start the ears at the top, however, thought had to be given to where the threads needed to start from so they ended on the outside to be taken into the trail rather than having to tie knots where the ears joined the head.  The direction worked is on a diagonal, there is a pink line showing the row which dictated this.  Nearly all the pairs are added by making sewings into the edge of the face.  

Towards the lower part of the ears, the lengths of thread needed became very short, some only going an inch or two before being thrown out.  This was fine because I had kept end threads on bobbins, expecting this to happen.  

Tying two short threads together and winding back the knot to one bobbin gave a working length of 6 inches between the two bobbins, this is enough just to make those tiny distances without having to use new thread.  Because I use the same white thread for all my experiments, I have a bundle of thread taken off bobbins and I can just pull a length out when I need a short bit. 

The trunk is made as a continuation of the face and finished at the tip.  On the first elephant, I unpinned the last inch or so of the trunk and pinned it away from the leg so I could work the leg in one piece, sewing the trunk to the leg afterwards.

The second elephant's trunk was worked differently, the trunk was left pinned down and I worked down to the trunk, made my sewings into the edge of the trunk, and made plaits to lay on top of the trunk. These were sewed into the lower edge of the trunk before continuing with the mayflower ground.  The one outer edge trail continued unbroken, only sewn to the edges of the trunk.   

This choice of continuing the threads unbroken dictated that the elephant was    worked face down. It would be turned over when finished. The bead eyes are no obstacle to this, they simply pop through the half stitch and appear on the other side after the piece is taken off the pillow. 

As I worked down to the foot, I didn't start the other side of the trail. Instead, I used glass headed pins to hold threads where they would normally have joined or turned at the edge.  This meant I could work just one edge trail all the way down, across the bottom of the foot, taking in and discarding threads as I went, and then work up wards to where the trail needed to join onto the trunk again, effectively making a 'U' shape trail.  

This avoided the need to have a join of two trails meeting at the foot.  Instead, it neatly sewed into the edge of the trunk with minimum fuss.   This is something I wish I had figured out earlier and will continue to use this method, though I am not sure if it will be frowned upon or not!

Directions showing 'U' turn working of the legs. 


The finished second elephant looks better for the effort made in replanning both the stiches and the order of work. 

First on the left, final on the right.  Spot the differences!

Part 2 - Drawing the design will appear at later. 


You Asked for my Design Process - Part One - The idea

Everyone has their own ways of finding inspiration for designs and following it through to a finished piece of lace, this odd way has worked well for me on occasion. 

Insomnia plays a part.  To stop my mind being restless at night when sleep isn't an option, I  give it something to do.  I send myself off on a favourite walk, taking in the details of trees and flowers in the hedgerows, or have a wander around a town I haven't seen for years, or listen to the waves of a long ago seaside visit, smelling the sea, and feeling the heat of a long gone sun on my shoulders.  

Pain ups the game.  Sometimes more concentration is called for, so I turn to figuring out the construction of a dream house, or how to best cut fabric for a new patchwork quilt and the order of sewing,  or how to make a new shape of pincushion.

When it is obvious I am in for a long, unsleeping night, I have to give my imagination a longer project to chew on.  Lacemaking is good option because of all the different aspects of a new design.  Sometimes I get the completed design nearly straight away, maybe I had been thinking about one and I just needed brain space to visualise the finished lace

I flash up a drawing, a shape, and pull and push it about as though I have a pencil and paper.  I fill it with lace, what edge does it have?  The edge depends on the filling, so what filling suits the shape?  

It looks like a fish, so needs a smooth edge, a two pair will do nicely and  'festoon' would make lovely scale shapes, but I need a bigger body to give that stitch enough room, it will have to be more of a cartoon fish than a realistic shape then.  Maybe I could attach some sequins inside each of the scales or just add tiny seed beads along where the picots should sit?  Let's see if that is possible. 

Ping! Now I am using pale bobbins, not sure why, just the ones I tend to go for at night, though I don't have a set of pale bobbins in awake time! Handy to not have to wind them each time though, and always the right colours just where I need them.

I don't seem to need a pillow or pins with unasleep lace making. I can flip the piece over or rub out a section that didn't work, add a new bit and carry on.  The crochet hook sewings never snags the thread, bobbins stay in order unsecured,  but I still have to make sure that each bobbin has the same length thread, I do like them neat!

I abandoned festoon, I think Honeycomb would suit better and I do like making it because it has a gentle dance when being worked.  Let's see if the sequins will fit inside the centers... the threads and sequin work themselves up in the air, a bit like 3D 'Fantasia', having a few tries till it all slips nicely into place and the sequin is tensioned in the center, I will have to remember how I did that when it comes time to make it for real.

The finished fishes are all over the place, colours, sequins, beads, I made some of them longer, some rounder, give them different tails, wonder what they would look like if I embroidered them instead, would they translate into applique?   

What if I used just one body shape and used differenent laces to fill them?  A practice piece to see how fillings can alter the look of one simple shape?  I draw a curve, mirror it and there is the body, a few different tails, little fins added on and now to try different fillings... 

Ping! there they are, a bit of sequin ground, a bit of tape lace with beads and shiny thread, a few tallies of course, stubby tail, long tail, and big sequin eyes on blue, pink and gold fish.  I drew them for real the following morning and put a few of them in the computer for printing onto blue card.


Of course, this is 'just' the design idea, the making of an actual pattern and making all the real lace pieces is a much more laborious task and I will detail that process at another time. 


'Foggy' takes his first wobbly steps.

First wobbly steps of little Forget-me-not, or 'Foggy' for short.  This design will be remade and filled out with a fuller roseground on his face, a bit more of a tummy, some shape defining grey gimps and a longer trunk as he grows up.  Still wearing his pajama trousers, he explored the garden and took a liking to the tiny 'Forget Me Not' flowers in the garden, and so his name was chosen. 

The process of making the first version of a new pattern is often full of relief that some bits worked better than I thought, and also of frustration when the pins are removed much further down the pattern, to find that some parts had not gone as planned.  I made the roseground too large and Foggy's eyes are too high so that will be corrected on the next working.  

Unusually for me, I made this little chap in sections.  I am not a fan of sewings, but the more I do, the less they bother me.  The sectional way of making larger pieces of lace means there are fewer bobbins needed at a time, maybe 25 pairs instead of 125 pairs!

I am trying to decide if this little chap is a possibility for the 'Bobbin Lace Along' facebook group where we have a live pillow and members often work the same pattern with the experienced members helping those who need it.  


Asymmetrical Spider - pattern and workings.

I remade this Torchon style spider bookmark which I designed early on in my bobbin lace making journey and found that I still enjoyed a bit of Torchon after neglecting it for a few years in favour of Bedfordshire and Cluny type laces.

This little pattern uses asymmetrical blocks in different sizes.  Each block can have any treatment, I used rose ground in one of the blocks and a single rose in one of the smaller blocks.  This could easily have been worked by using the blocks just as samples of grounds in place of spiders.  


I wasn't happy with the points on the outside, but as I hadn't been making lace for long, and there were no instructions because I had just joined lots of spider squares together rather than using an existing pattern, I made it the best way I knew how at the time.


This second one turned out better.  Then I enlarged the pattern to make it with a thicker crochet 20 thread during a lace zoom on a live pillow.  Plenty of spiders to choose from so each bookmark is different.  

The edge involves carrying pairs as the sides zig zag in and out,but this doesn't affect the number of pairs throughout the whole length of the bookmark.  Using 6 pairs of passives to allow for three pairs down each side, the total number of pairs is 19 depending on what thickness of fancy thread you choose for the passives, and which edge stitch you choose.  

You can use any 'start at a point' you like, there are many to choose from.

I did it this way.  Hang 2 pairs of workers open and twist one side twice.

Place a temp pin below the top pin and hang 6 pairs open. These are the passives. 

Work one pair of workers through one side of the passives.  Repeat on other side. 

In the centre, cloth stitch and twist the two worker pairs under the temp pin in the middle.  Work back to the outside edges on both sides. Work the outside pin on each side.

Work back to the first proper inside pin with both workers, here you can cross the two worker pairs around the pin, or use the same pin twice.    Continue to work down the sides, adding the pairs needed for the first spider.  The temp pin can be left in place. 

The outside points do take a bit of work to keep the passives tucked up to the very corner of the point as they want to gravitate to the inside pin when tensioned, so I used a Honiton technique where, after working the pin, I made a single overhand knot after the first, and sometimes after the second pairs of passives too.  These knots help to restrain the passives  to the point when tensioning further down the sides. 

When the edges turn centerward, the passives from the spider legs have no pin to go to, they get worked alongside the passives for a short distance till you need them again.  This makes the passive trail a bit thicker around the inside bends but they snuggle up and soon go back into the pattern. 

Working the final edge trails on the last big spider, the legs get taken into the passive trail.  There are too many to carry without a strange, thick edge being made so it's time to throw some pairs out.  

When you have 5 pairs of passives in the trail, choose two alternate bobbins, not side by side ones, and lift them up and away from your work. So this on both sides. Don't cut them off yet.

To choose the right pair, use threads away from the edge where you are taking spider legs into the trail. Don't choose the very outside thread.

Lift your chosen bobbin and look underneath the thread, if you see the worker going sideways underneath, pick the next bobbin to it, look underneath and you will notice that it lifts the worker lying on top of it, this is the thread to throw out.  Pick the next alternate thread and both will have the worker going over the top.

When you get to where the final trails meet, divide the threads into two sides, choose a worker bobbin from each side and tie a knot.  Lift the bobbin bundle from each side in turn , (there is no need to keep these bobbins in any order so just grab them) and pass a worker around a bundle and lay back in the center, repeat on other side.  Tie a knot in the workers. 

Now the fun bit...

*Lift the left worker and pass around the right bundle, lift the right worker and pass around the left bundle, cross the two workers in the middle*.  Repeat from*to * for however long you want the double whipping to be. Tension and push up the workers every few turns.    Knot the workers at the centre to end it.  

Thread both workers onto a sewing needle and sew from above the knot, through the middle of a bundle.  This will anchor the worker threads and stop them sticking out from the knot.  Cut the free threads of the tail to desired length.

There will be a video on my Youtube channel on choosing threads for throwing outs, the start at a point, and the two sided whipped tail. 


The downloadable .pdf pattern sheet is in the Files tab on my Lesley's Lace facebook page.

The A4 .jpeg can be copied from here, or my Lesley's Lace facebook page.

Please always respect the copyright of the designer.

This pattern must only be shared in its original form and cannot be sold.

If you wish to teach from this, or any other of my free patterns, please ask for permission first.

If you wish to include any of my patterns in group news letters or magazines, please ask first, and let me have a copy for my records.

Have fun!


Sequin Seahorse

I experimented with adding as many sequins as I could on my 'Adventurous Seahorse' design which is part of the 'Adventurous Aquarium' series of gifted patterns.

The idea for this collection of seaweed, fish, seahorses etc was to create pieces to follow on from the famous 'Springetts Snake' which introduces a selection of techniques in a wriggley snake shape.

When I think of a new technique, or fun way to bring lace to young person's attention as a form of art, I try to make the things that would have got my attention as an enthusiastic youngling crafter.  There is no right or wrong in the finished piece, only enjoyment and a hope that by encouraging young and new bobbin lace makers, lace can take it's place as a more mainstream craft, protecting it for the years to come.

For the pattern, see earlier posts on this blog, or visit my Lesley's Lace Group on facebook where the patterns are under the 'Files' tab. 

https://www.facebook.com/groups/907516516997481/


Celtic Art Nouveau

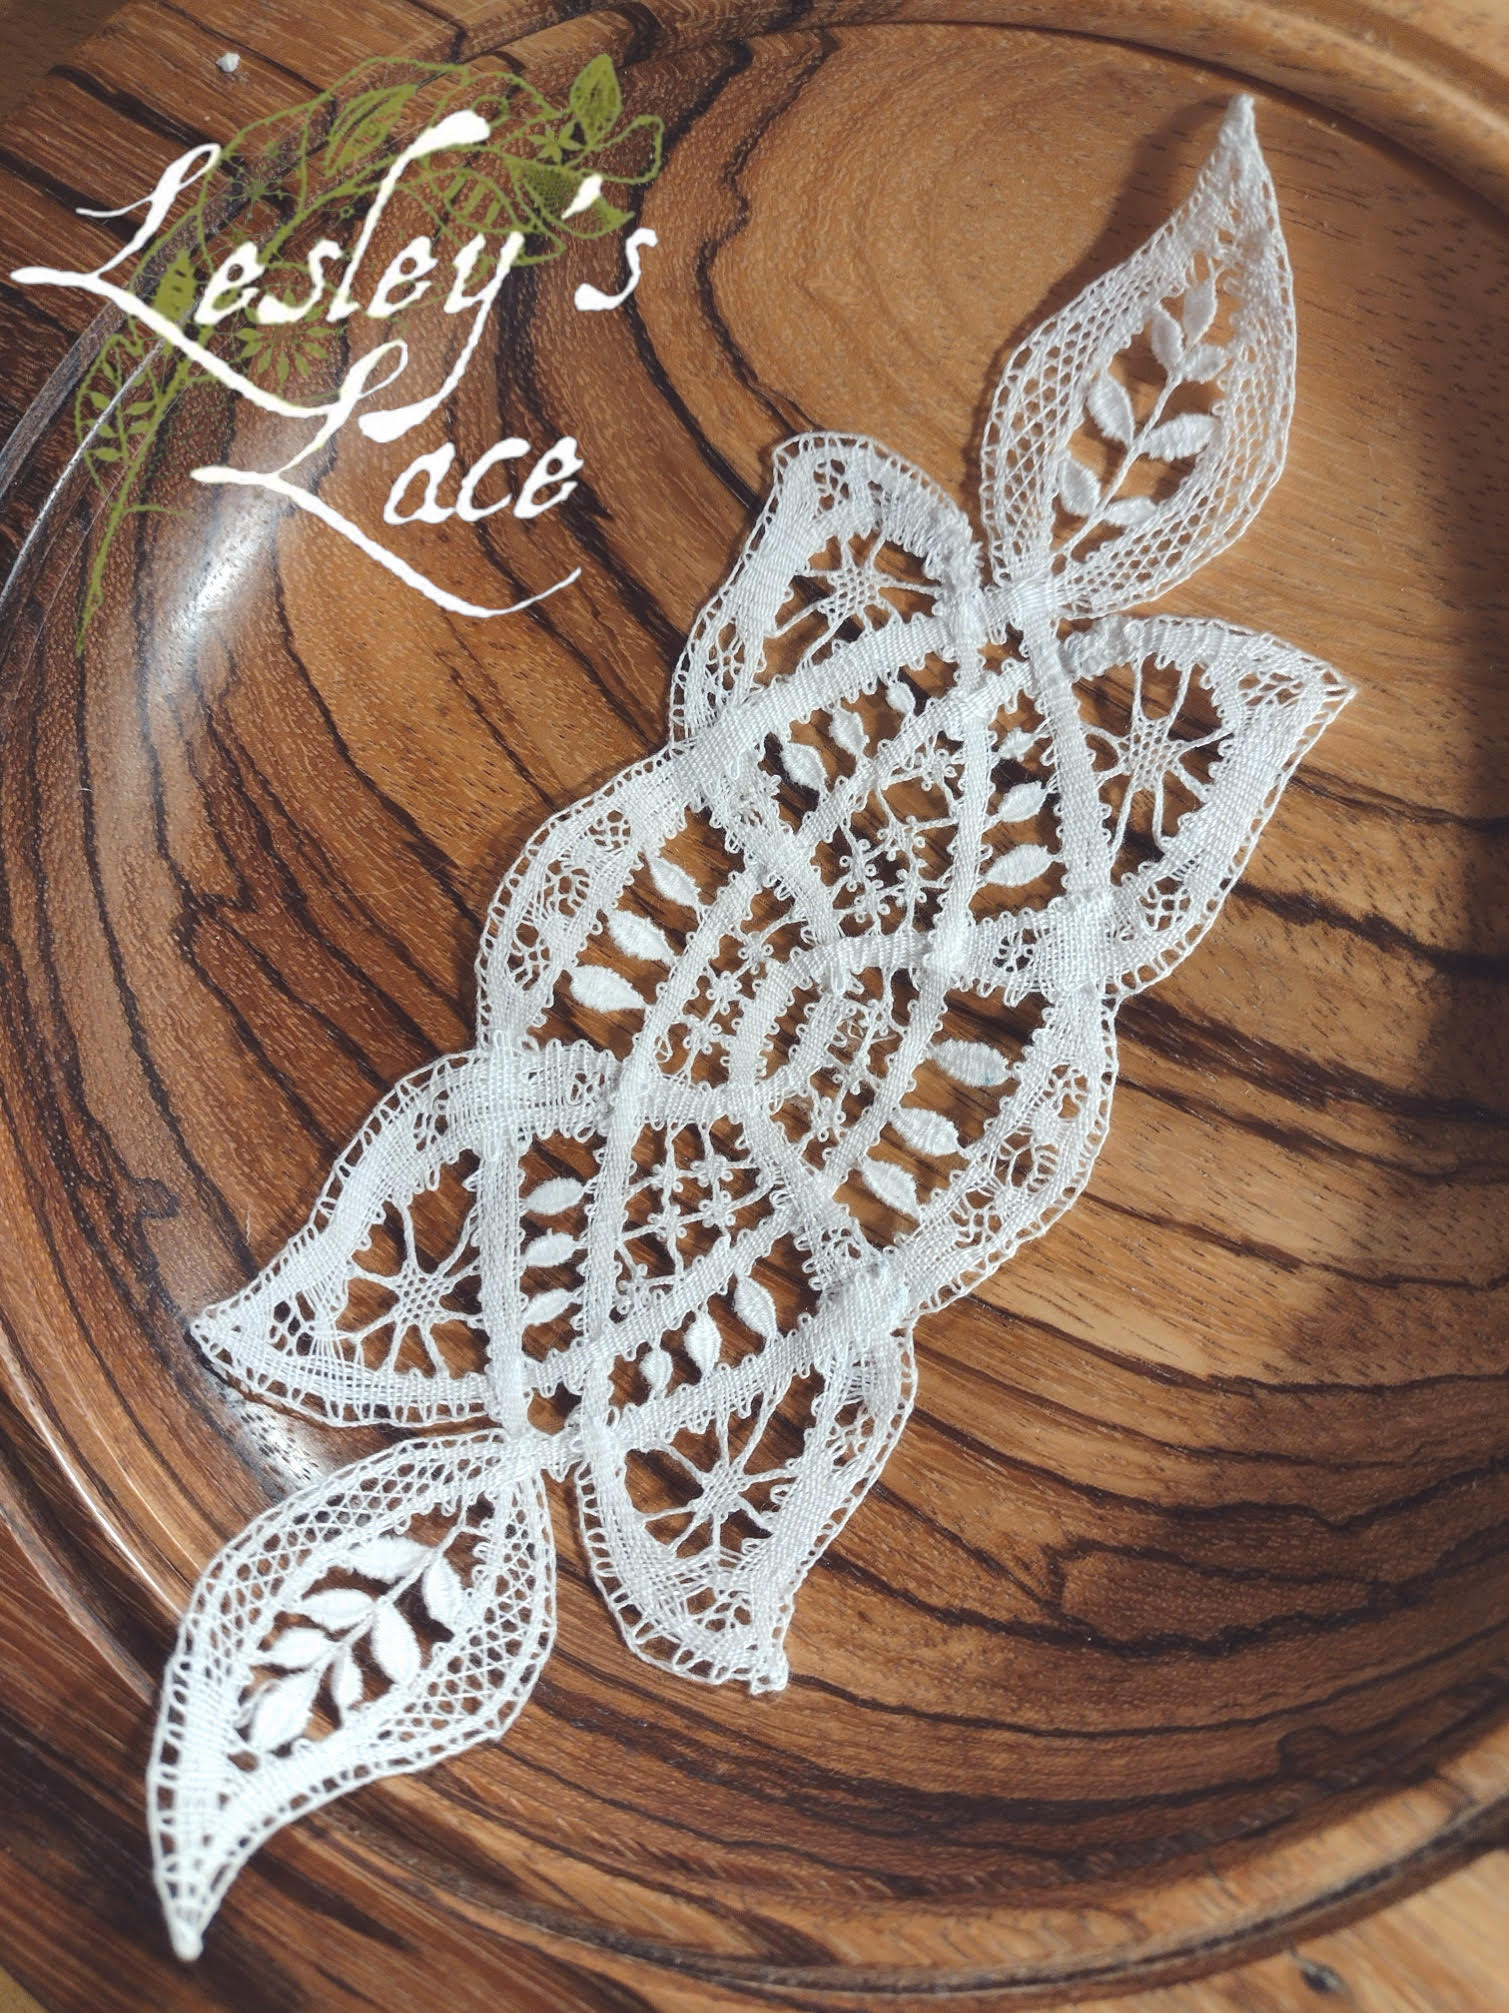
Mixing art styles as well as lace techniques, this design features Honiton 4 and 5 pin holes and Blossom ground.  A little sprinkle of Bedfordshire tally sprays and spiders, a touch of Muaiga magic and that's all there is to it!

A beautifully grained black walnut bowl provides the background, even though it does distort the lace a bit, well worth showing off such a lovely thing. 


This piece was made with six groups of bobbins, each of the three leaf tips started working in both directions.  For this I used a white Empress Egyptian machine quilting thread at around 28 wraps per centimeter, similar to DMC 80.

There were a lot of throwing out and throwing back in threads, so very hard to estimate the number of bobbins used in total, used around a caseful and a bit, so maybe about the 70 to 80 pair region.

The amount of over and underlaid crossings was fiddley, a lot of fine crochet hook work.  I used a non rotating pillow for a change and really missed being able to turn the pillow a bit to get the tensions under control a bit better.  

This is my original design which I painted onto slate quite a few years ago.  The crossings were much easier to paint than to make in lace!


Wriggley Ribbon


Although originally designed as more seaweed for the Adventurous Aquarium series, I  found this pattern was very handy for experimenting with in little sections of the ribbon like design to test colours, adding other craft materials and making demo videos.


The gentle wriggle of this design makes it ideal for Christmas decorations, long streamers in silver and sequins for a tree, little sparkly wriggles for festive earrings, little petals and leaves for flowers, a little versatile pattern designed to have fun with.  One of the wriggles is left blank for you to draw in your own choice of lace filling.  Ideal to test out a new stitch or different edging on a small sample piece.


Tally making for painful hands.

A question from a lacemaker who was struggling to learn how to make tallies because of the arthritis in her hands made me think about how I sometimes have to alter my way of making them when my poor old hands are too painful to use.  

Holding the spread of the passives under tension is key to shaping the tally when working on a flat pillow with Midlands (spangled) bobbins.  The 'roll in hand' method using continental bobbins on bolster pillows may be easier but I use neither of these.


This little video shows how I alternate with using the side of each hand with only one hand tensioning the worker and it's partner.  This method rests each hand in turn and does make tallies that little bit less painful.

Of course, once the warmer weather kicks in, and old bones warm up and respond more eagerly to lace making, tallies are added to the menu again and I jump back into making my favourite Cluny and Bedfordshire laces which are often full of tallies.

 Link to YouTube video of Tally making for Painful Hands

Block Pillow multi works in progress

 Block pillows are my favourite for many reasons. My first block pillow was donated to me years ago and it holds a special place in my heart as the one l learned all my laces on, hoping that the echo of the lacemaker who donated it was guiding my bobbins. 

I created several different shape blocks for different projects, my favourite being discs which l can turn as l work on small floral or tape laces without turning the pillow and disturbing my pin cushion etc. 


Putting aside one project to work on another always means having to store a pillow somewhere else, this is made so much easier by simply just removing the block with the work on, and replacing it for another project. 


This little video shows how l manage my work, and how you don't always need lots of pillows for different classes/projects being worked at the same time. 

https://youtu.be/yVlQSyDfe9k?si=dfLa8xXv2cUeur5d

Painted Adventurous Seahorse.

Experimenting with my pattern for the Adventurous Seahorse, I changed the thread to white 28wpc Egyptian Cotton and increased the number of pairs used in the body as well as working a plait and picot zigzag along the back.  Size 8-10 cm. Add more or less passives if needed. 

I kept the pattern very plain so I could see how/if the Inktense block paint would run and blend.  My previous experiments using the Inktense blocks worked well, but I wanted to see if it could be used for a full piece, rather than just spot colour on a finished piece of lace. 

Made in white specifically for painting. 

I risked applying the paint while the lace was still on the pricking.  No colour was visible on the back of the pricking thank goodness, and the pins were wiped clean and dry as soon as possible.  

This time, I used a larger brush and loaded it up with more paint.  This resulted in quite a strong colour being taken, despite the dilution.  Strangely enough, despite the extra amount of paint, the colours didn't always penetrate the full thickness and at the back of the piece, some white thread was still visible and the colours were paler.

The finished piece is painted while still on the pricking/pillow

To dry the piece of lace, I laid it onto a piece of kitchen roll, covered it with more kitchen roll and then ironed it till dry.  This helped to fix the paint, and also to keep the lace in shape as it would have curled and warped left to dry on its own.

I have previously handwashed a piece of Honiton lace I made, using the same thread and it ironed dry a little paler, but still coloured.  This piece, with the delicate zigzags, may not appreciate being washed so I am not going to wash this one.  It is for decorative, rather than wearing purposes.

A touch of variegation.

I maybe didn't make the most of the colours, I had intended to use paler jades, turquoise and pinks in more splotchy areas but the paint seemed to grab very quickly.  I suspect a much more diluted mix is needed.  

The coloured stripes could have easily been created using coloured passive threads with more control, however, this piece was primarily an experiment and it does sit very nicely with the other Adventurous Aquarium pieces.

See my earlier posts for the free pattern for the Adventurous Seahorse and other Adventurous Aquarium patterns. 

Paint used is Derwent Inktense Block paints. 


Tiny Honeycomb Heart


I originally designed this little heart to use up the threads left on my bobbins after making larger patterns.  It soon became a project in it's own right when l used different fillings, passive stitches, edges and threads. Keeping to the same 4cm outline pricking, it became a handy way of experimenting with different ways to fill a small, curved shape.


The Honeycomb ground filling is based on approx a 60 degree grid. This is a six sided grid instead of the 4 sided Torchon style grid.  I like to use half stitch and twist, pin, half stitch and twist, which creates two twists after the cross instead of the usual one.  This gives an even hole surround to the honeycomb holes.  This can be varied by using different combinations like two extra twists on the legs or around the pin, for a different effect.  Well worth experimenting with this very useful ground.

Honeycomb is made by working one part of the stitch on the first row, then on the return, the second part of the stitch. 

On this little heart pattern, the edge pins cannot line up exactly with the honeycomb grid, so you have to use some artistic licence. Offer the pair to the first available pin, and then to the next one along to see which looks best.  Remember, you may need the next pinhole for the next row, so that is something else to consider.  

Near to the edge, where there may be a very close line of honeycomb stitches, you can choose to miss these out and stretch the honeycomb to reach the edge, or work them to keep the ground close to the edge.

Curvy edges create the need to add, throw out, and carry pairs.  This means the edge should be able to hide them as you go along to avoid knots.  Cloth stitch passives are the most forgiving.   Work the edge passives and pick up the pair you want to carry or remove, continue to cloth stitch through these and work the outer edge pin.  

To 'bounce' a pair off the edge - Work the pin and either swap the worker with the ground pair, or return the pair to the ground after working the pin. 
   
To carry a pair- Work it in with the passives till the pair is at the pin where you want it to re-enter the ground.  This makes a slight difference in the thickness of the edge so you don't want to carry too many extra pairs.  

To remove a pair after working it into the passives from the ground - Pick the second and fourth bobbin from the outer passives (making sure they are the ones that don't show the worker underneath when you lift them, if they do, choose the third and fifth bobbin)  and lay these back by lifting them upwards and lying them above your work so they don't get in your way.    
Don't cut these off yet, if you have made a mistake, you can reverse your work and pop them back into place, but once cut off, you don't have this option. 


I made this large heart with crochet thread 20 to make it easier to see during a live pillow in a zoom group.  


Test before Investing in a Bolster Pillow

Two pairs of lovely Duchesse bobbins came into my possession which created a need to try out a bolster pillow.  All the sawdust and cutting straw put me off making one so I made this bolster pillow just to try out my 2 pairs with a little 2 pair pattern.  

It is not meant to be passed down the generations, or to do more than satisfy my curiosity as to whether I want to go down the path of using small numbers of bobbins and making tape laces, or do I stick with my favourite block pillows and loads of Midlands bobbins. 

Kitchen roll, cotton fabric, boiled wool blanket, pins.

Wrap the kitchen roll tightly in two or three wraps of the blanket, cutting the edge to the same width as the kitchen roll.  Tension and pin the end, sew to secure and remove pins.
Cut fabric to leave 6 to 8 inches over at each side, wrap around tightly and turn under the edge along the roll, pin in place.  I didn't plan to make lace over the pinned area, if you do, then simply sew this edge the same way as the blanket.  
Gather the excess fabric at one end, twist it around tightly and push it down into the centre of the roll.  
Stuff the fabric down into the roll by using up any scrap blanket trim, or socks, or similar to add weight to the roll, and to secure the ends.
At one end I squeezed in a small pin cushion, just the right size!  
Sit the bolster in a box, or roll a towel or blanket to make a long sausage and wrap it around to make a nest for the pillow to sit in. 
I drew a quick tester pattern for using the two pairs of bobbins I have, this was just to see how they handled. 
They behaved quite well.  Keeping track of 4 bobbins was easy enough.  The creases on the edge of the roll worked to hold the bobbins when I placed them over the sides. 
I tried a little bit with the bolster up on it's end. 
My little piece of tester two pair lace.  So far so good.  It feels strange to be a beginner again and have to learn how to handle bobbins in such a different way. 
 
This bolster pillow can be unwrapped, fabric reused, and the kitchen towel (although a little fluffier for being stabbed with pins) can be put to it's normal use.  A good way to test before investing.